Ground Loading Trailer
Lights & Wiring Cont'd
Cable Preparation & Routing
Prior to running the light cables, we need to drill a couple of holes to assist with threading the lighting cable from the plug to the rear of the trailer.
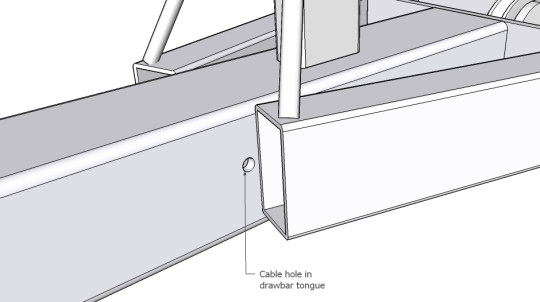
Drill a hole just forward of the end of the main drawbar into the drawbar tongue.
From the front of the main drawbar section, slide a semi-rigid section of mild steel "pull" wire down the drawbar until it comes out at the spring end of the drawbar. Tape the trailer 5 core cable (seven core if you are fitting electric brakes) to the end of the "pull" wire and pull from the spring end until the cable comes through. Pull through approx. 300mm of cable out the spring end of the drawbar - this should be enough to work with.
Work out how much cable you will need at the coupling end, allowing approx. 500mm extra. Cut the cable and thread it from the front of the main drawbar section, through the hole in the drawbar tongue and out the coupling end. The tongue can be drilled on the side at the coupling end to allow the cable to come through.
Note - wherever the cable passes through a hole in the steel work, the appropriate sized rubber grommet must be used to prevent chafing and wear on the cables protective insulation. If grommets are unavailable, use a neutral cure silicon caulking in & around the hole once the cable has been fitted.
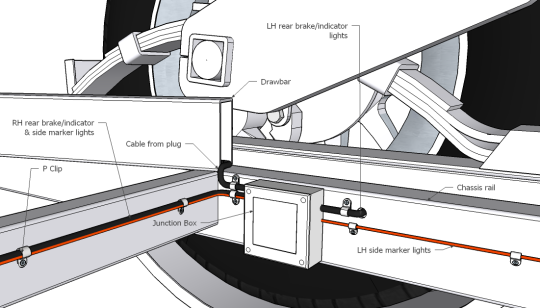
Position and fit a junction box as shown above and drill outlet holes (including grommet diameter) for the cables to pass into and out of the junction box.
Drill an additional hole in the chassis rail for the Left hand brake/indicator cable to go through down to the end of the chassis.
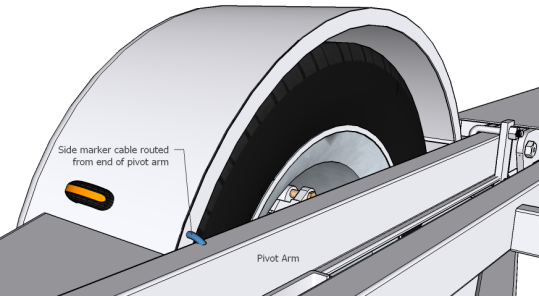
Route the LH side marker light cable along the side of the chassis rail, through one of the cross member, up and across the front of the pivot beam, securing with "P" clips all the way.
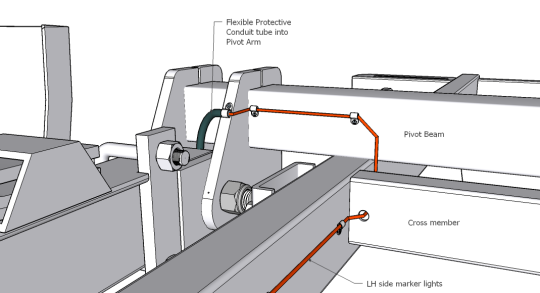
Where the cable goes inside the pivot arm, slide a flexible protective conduit tube over the cable and secure with tape or heat shrink tube. This will help protect the cable when the trailer goes through its tilting action. Wherever possible, fill the ends of the flexible conduit tube with neutral cure silicon caulking to secure the tube to the cable and prevent any damage to the cable.
Repeat the same with the RH side marker light cable.
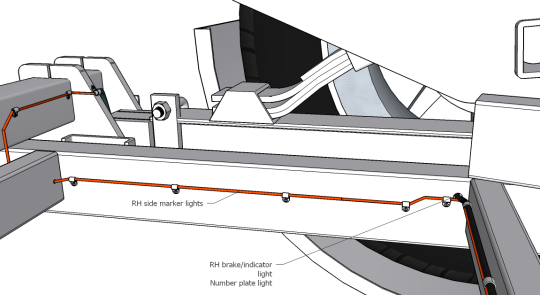
Take the RH brake/indicator cable from the junction box, across the side of the cross member together with the side marker cable, and route it into the chassis rail to go down to the lights at the back of the trailer. Use your semi-rigid "pull" wire where required.
Drill a suitable sized hole on the top of the pivot arm, next to the guard edge where the side marker light is to be positioned. Use your "pull wire" to thread the cable from the pivot hinge up through the top of the pivot rail. Once through and connected to the light, "P" clip the cable to the inside of the guard, preferably below the level of the guard brace.
When running the side marker lights, leave at least 200mm of slack cable stored within the pivot arm cavity to allow for any adjustment of the spring beam should it be moved forward or backwards.
Use grommets where the cable comes out of the pivot arm and into the guard and fit a protective conduit sleeve over the cable for additional protection. Apply silicon caulking to secure the conduit onto the cable.
NOTE - If you lights come pre-wired with cable, reverse the route direction of the cable - from the light to the junction box.
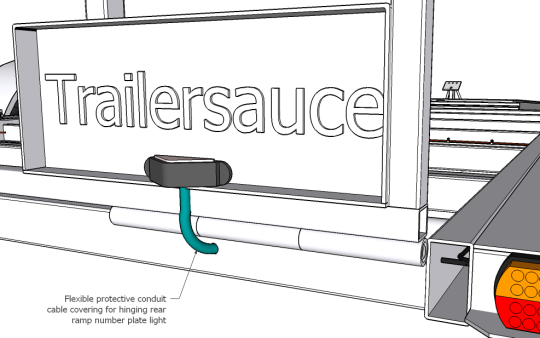
Fit a flexible protective conduit sleeve over the number plate cable where it comes out of the rear cross member and up to the light. Allow a little bit of slack cable to provide a bit of flex.
Once the lights and plug have been wired up, connect the trailer to the tow vehicle and operate the lights to check they are working correctly. Use mirror behind the trailer if you have no assistance.
Check that all the grommets have been installed, or use lots of silicon goo where required and get on with finishing the trailer!