Ground Loading Trailer
Lights & Wiring
NOTE - Before doing any cable fitting, it is advisable that the trailer is fully prepared and painted or galvanised and at the bare minimum, has a primer coat applied.
Click to Enlarge
Light Fitting Preparation
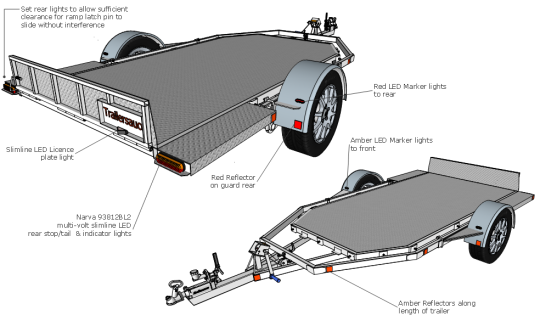
On the rear corner support arms, mark out the light mounting hole and cable hole positions. If the light manufacturer has provided a template for the holes, use it.
Drill holes for mounting the side marker lamps, positioning them where they are fully visible from behind and if possible, where they are least likely to be damaged from knocks and general use.
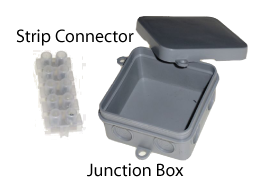
Other options include soldering the wires together and sealing with insulation tape and a heat shrink tube or using crimp connectors and covering again with heat shrink tube. These options take less time to do than the first option, but will cause a bit of a headache when maintenance needs to be done at a later date.
In the next section "Lights & Wiring Cont'd" the routing and placement of the cables and junction box are shown.
NOTE - Wherever the cable passes through a hole within the steel framework of the trailer, rubber grommets should be used to prevent chafing and damage to the cable through normal trailer use. Damaged wiring caused by connection with the steel chassis will eventually cause the lights to malfunction and fail - finding the fault can become a time consuming and frustrating, and seemingly impossible exercise! Take care routing the cables through the trailer when fitting, and if you cannot use grommets once in position, liberally apply a neutral cure silicon caulk around the cable and hole.
FRONT MARKER LIGHTS
For front marker lights, an additional two lengths of 2 core cable need to be run from the junction box, back along to the length of the trailer to the front marker light positions. The "P" clips used for the main cable can be used to support these cables.
NOTE - With sealed LED lights, the lights are normally supplied pre-wired, and the cables will require reverse wiring (from the light to the junction box/plug)
Crimp connectors are the most convenient method for joining the wires to sealed lights with attached wiring.
PLUG
Pass the plug end cable through the cable hole drilled in the top or side of the drawbar and slide a suitable sized rubber grommet over the cable to prevent any chafing of the cable where it passes through the drawbar.
Trim the length of cable so that the cable can move with the trailer behind the tow vehicle without being stretched or kinked, but not too long that it will dangle too close to the ground.
Slide the plug sleeve or nut, (whatever was supplied with the plug), over the cable, then strip each end of the plug wires leaving approximately 10mm bare wire, fold the bare cable in half and enter them into the plug connector in the correct sequence as per the chart above. Tighten the screws snugly but do not over-tighten. Screw the cable clamp down to prevent the cable from pulling out and fit any sleeves, nuts or covers that came with the plug.
If possible, check all your lights by hooking the trailer plug up to your tow vehicle. If you don't have a mate to help you check your brake lights, grab a mirror and position it behind the trailer where you can see it from the tow vehicle.
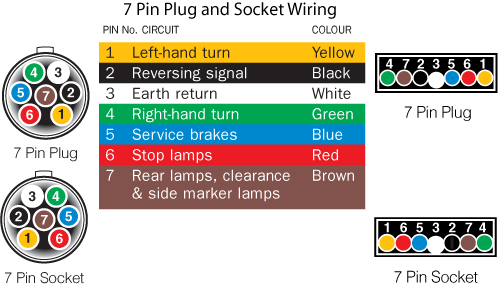
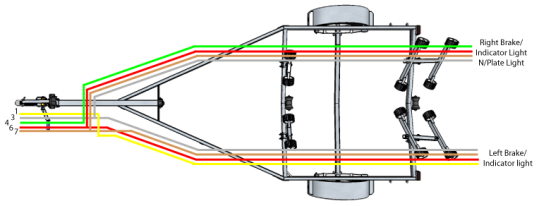
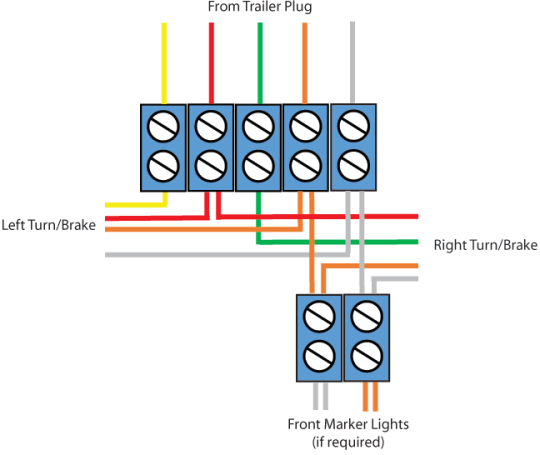
Use standard 5 core wiring for an unbraked trailer, or if using hydraulic disc brakes. Use the following diagram for the junction box wiring.
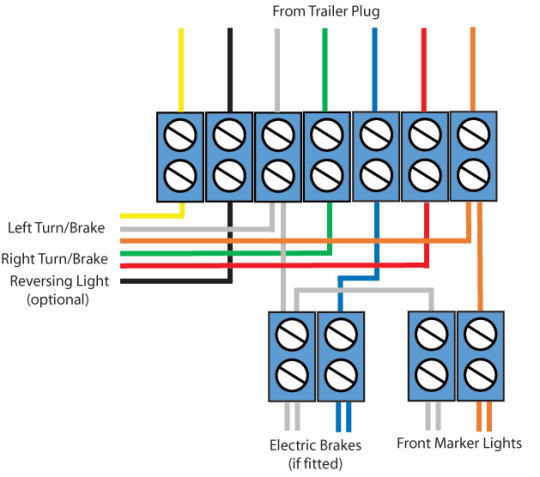
For a trailer fitted with electric drum brakes, use 7 core wiring. Use the following diagram for the junction box wiring.
On the next page, we will deal with routing the cable through the trailer -