Note
Before doing any cable fitting, it is advisable that the trailer is fully prepared and painted or galvanised and at the bare minimum, has a primer coat applied.
Running the light cable
From the front of the trailer, slide a semi-rigid section of mild steel "pull" wire down the drawbar until it comes out an oversized hole drilled on the inside of the drawbar close to the spring end. Tape the trailer 5 core cable (seven core if you are fitting electric brakes) to the end of the "pull" wire and pull from the spring hanger end until the cable comes through.
Gently pull the cable through until you have around 200mm free cable. Slide a section of flexible conduit over the cable where it exits the tilting drawbar and tape it securely to the cable. This will prevent chafing of the insulation when in tilting operation.
Allow another 600mm extra at the coupling end of the drawbar for wiring into your plug.
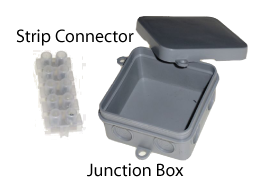
Fit a junction box near the spring hanger and wire in the main cable to the strip connector. Run 2x 5 core cables from the junction box down the side of the chassis rail through the holes predrilled in the crossmembers to the light channel.
Drill through any cross members or chassis runners not already drilled to allow the cable to be threaded through.
All other cabling required for both the front & rear marker lights and electric brakes can be taken from the junction box to their required positions.
Wherever any cable passes through any steelwork, apply silicon sealant or a similar fixant around the hole/cable to prevent any chafing or wear on the cable.
Fitting Lights
Make sure that your number plate light is in the correct position and that the light will shine on the plate. Keep your lights as wide as possible in the light channel, but do not place lights directly behind the rod bracing.

Mark out your light position on the light channel and drill the mounting and cable holes as per your lights instructions or template.
Other options include soldering the wires together and sealing with insulation tape and a heat shrink tube or using crimp connectors and covering again with heat shrink tube. These options take less time to do than the first option, but will cause a bit of a headache when maintenance needs to be done at a later date.
FRONT/REAR MARKER LIGHTS
For front & rear marker lights, an additional two lengths of 2 core cable need to be run from the junction box, through the front conduit to the lights on the other side. The marker lights on the junction box side are wired direct from the junction box.
Crimp connectors are the most convenient method for joining the wires to sealed lights with attached wiring.
PLUG
Pass the plug end cable through the cable hole drilled in the top or side of the drawbar and slide a suitable sized rubber grommet over the cable to prevent any chafing of the cable where it passes through the drawbar.
Trim the length of cable so that the cable can move with the trailer behind the tow vehicle without being stretched or kinked, but not too long that it will dangle too close to the ground.
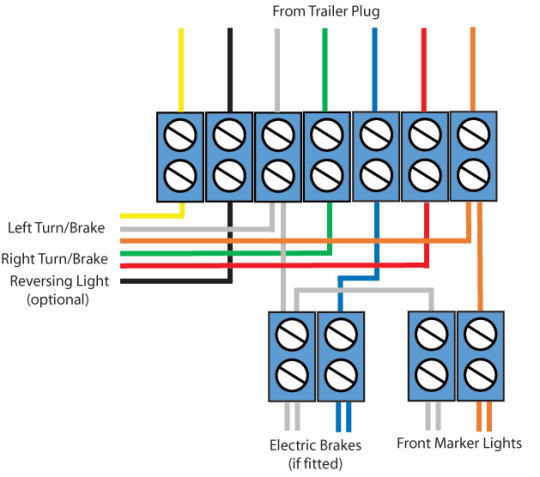
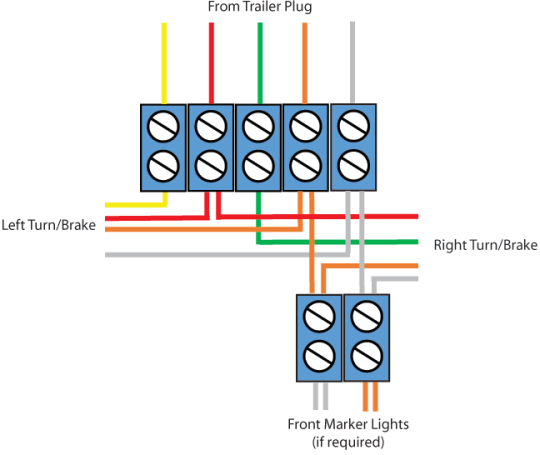
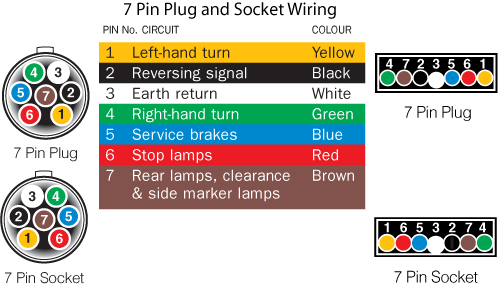
Slide any plug sleeve or nut, that came with the plug, over the cable, then strip each end of the plug wires leaving approximately 10mm bare wire, fold the bare cable in half and enter them into the plug connector in the correct sequence as per the chart above. Tighten the screws snugly but do not over-tighten. Screw the cable clamp down to prevent the cable from pulling out and fit any sleeves, nuts or covers that came with the plug.
If possible, check all your lights by hooking the trailer plug up to your tow vehicle. If you don't have a mate to help you check your brake lights, grab a mirror and position it behind the trailer where you can see it from the tow vehicle.