6' x 4' Wooden Sider Trailer
Springs
The ideal spring position for a standard use trailer is 50mm back from the centre as shown. If you are fitting a hinging rear ramp to the trailer, the spring offset will need to be adjusted back to compensate for the additional rearward weight.
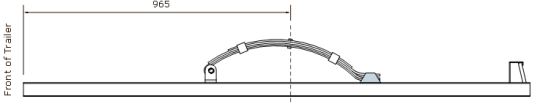
Set up your springs in their front hangers and position the springs and hangers on the chassis rails (hanger towards the front of the trailer) and using a large square resting on the chassis rail at the spring centre mark, adjust the spring position until the spring bolt or pin is in line with the spring centre marked on your chassis.
Make sure that the outside spring edge is flush with the outside edge of the chassis rail and once double checked, tack weld the spring hanger to the chassis rail.

Once this is completed on both sides, position the slippers over the spring tails allowing for clearance between the spring and the slipper for the spring to move in and out when loaded.
Again make sure the outside edge of the spring is flush with the outside edge of the chassis and tack weld the slipper in place.
Where the spring hangers and slippers do not cover a cross member cut and fit a couple of 50 x 25 x 2.5mm RHS packers to support the overhang of these parts and weld into position.
Once all components are in position, tack weld securely, remove the springs and fully weld around the hanger, slipper and packers