3.6 X 2.0m Flatdeck Trailer
Top Deck Chassis
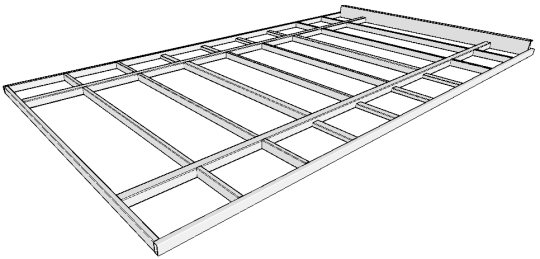
TOP DECK CHASSIS SETUP
Prior to starting, cut all the top chassis components as per the cutting list. Predrill drain holes, if galvanising, where any closed box section butts up against another. See "pre-finishing" for more details.
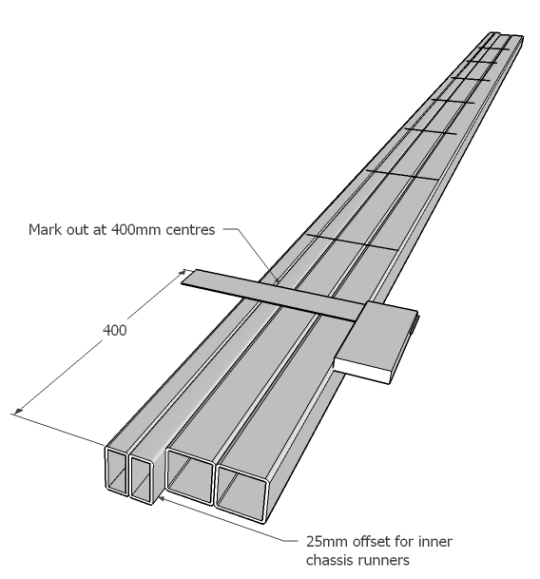
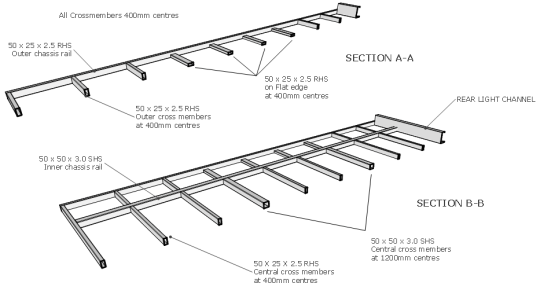
Lay both the outer and inner chassis runners together allowing for the 25mm offset at each end for the shorter inner runners.
Clamp together and mark every 400mm along the length and mark across each runner.
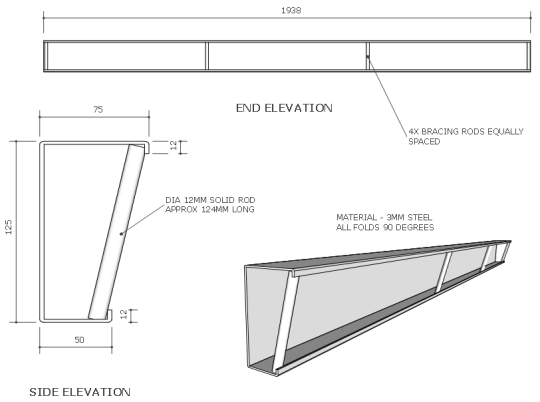
Cut and fold up light channel, as per the drawing below, and pre drill for your lights if you already have them on hand.
Fit rod braces to the light channel, one each flush with the ends and the other 2 equally spaced along its length.
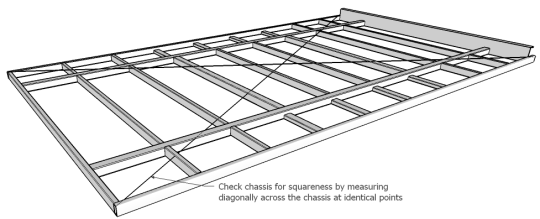
On a flat surface, lay out the chassis runners, front cross member and light channel and tack weld into position. Check the frame for squareness and adjust (see picture below) as required.
Once the frame is square, sandbag or clamp the frame to prevent any accidental movement (25kg bags of cement are perfect for this if you are building the frame on the workshop floor).
Fit all outer and inner cross members, centering them against the 400mm marks on the chassis runners.
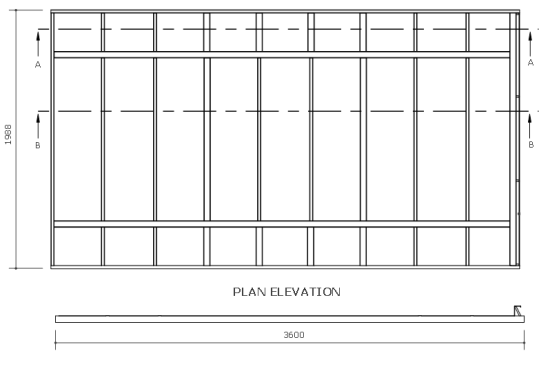
Where the outer cross members may reduce wheel clearance with the chassis, lay the RHS on its widest edge flush with the bottom of the chassis runners. See the cross section picture below (with reference to the plan above) to see which cross members need to be altered.
For the inner cross members, note the position of the two 50 x 50 sections. These are used to for joining decking material based on 1200mm centres. If your proposed decking material has different widths, you may need to alter the 50 x 50 SHS positions to suit.
Once all the cross members are in position, tack weld into place and recheck the squareness of the frame. Measure diagonally corner to corner from identical positions. Adjust the frame as necessary - see below for "Adjusting an out of square chassis frame".
Adjusting an out of square chassis frame
Where one measurement is longer, divide the difference between the two measurements and gently knock the longest corner of the frame to match the shortest side plus the difference in measurement – for example – if the shortest reading is 4100mm and the longest is 4120, the difference between the two is 20mm. Divide this in half- 10mm then knock the longest corner so your tape reads 4100mm plus 10mm (4110mm) Re-measure and keep adjusting the frame until both measurements are exactly the same. Once the frame is square, you will need to clamp or sandbag the frame to prevent any movement while the frame is being welded.
At this stage it is better to leave the welding until the sub chassis and tie rails are in position. Just make sure all the tack welds are strong and secure.