Building a Trailer Axle - Dropper Plates
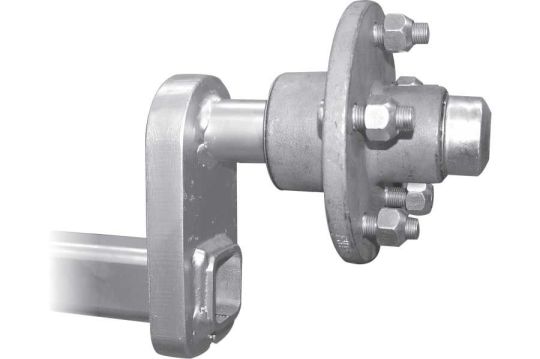
Dropper plates come in various heights and can be custom made to suit your specific requirements. They simply slide over both the stub axle and axle tube, and it is just a matter of getting things straight and aligned and welding up.
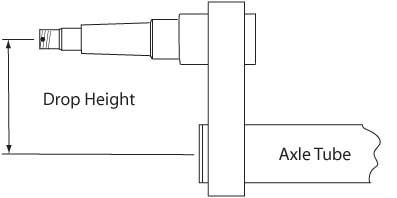
Most trailer part suppliers will have dropper plates in stock with standard drop centre heights of 65, 100 & 150mm.
Dropper plates are commonly cut from 25mm plate and thicker plates up to 40mm can be sourced, but if you have access to a gas cutting plant or plasma cutter and have time on your side, you can make your own from 5 or 6mm plate/flat bar and laminate multiple plates together for super strong dropper plates.
Solid round or square stock make the strongest axles, but for 1500 to 2000kg axles, 50 x 50 x 5.0/6.0mm SHS is suitable if solid stock is unavailable.
Cut the axle tube and stub axle so that there is at least 10mm sticking out the front and rear of the dropper plate to allow a good sized weld to be applied. Just make sure you have adequate back clearance between the dropper plate/stub axle and the trailer/chassis.
Slide the dropper plates over the axle tube to the correct position and lay the axle on its side so that both the dropper plates longest edge is laying on a flat and level surface.
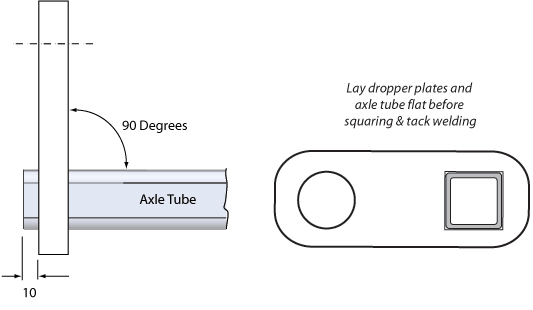
Double check the dropper plate positions, square the plates to the axle tube and tack weld together.
Dry fit the hubs to the stub axles using your cheap set of bearings and bolt up to the wheel rims.
Using a straight section of “U” or “C” channel longer than the overall width of the trailer, position the rims opposing each other in roughly the correct position.
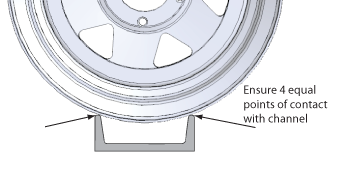
The wider the channel, the more accurate the contact will be (as long as the rim doesn’t touch the inner face of the channel).
Slide the dropper plates and axle tube over the stub axle and adjust the position of the rims to centralise the axle unit.
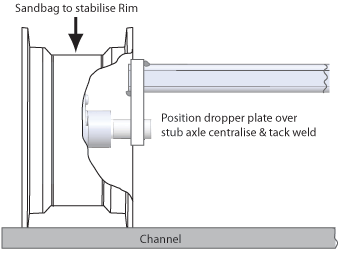
Working from one end, get the rim perfectly setup on the channel with 4 full, even points of contact.
Clamp if possible or sandbag the rim to prevent any movement. Adjust the dropper arm on the stub axle to the exact position and tack weld together.
After the stub axles have been tacked up, slowly spin the axle 360 degrees. The axle should spin freely without any movement or wobble from the rims. If any rim movement is noticed or there is any tightness when turning the stub axle, there may be some misalignment. Double check your measurements, break the tack welds and adjust if required.
When everything is secured with good tack welds all around, it is ready for welding and you can unbolt the rims and remove the hubs from the axle.
Turn up the welder and fully weld the stub axle and axle tube to the dropper plate.
Never run the welder earth through the hubs/bearings or on the stub axle. Always clamp the earth lead directly onto the axle tube - weld on a temporary lug if required.
Once welded, let the axle cool down slowly, do not quench or spray with water. The crystalline structure of the steel can be adversely affected by rapid cooling leading to potential weakening of the axle.
Once cool, double check position of the spring centre holes, drill or weld spring plates as required.
Cut a square of flat bar and blank off the end of the axle tube before painting. If galvanising the axle, predrill drain holes in the flat bar.
Remove any weld spatter and rough edges and thoroughly clean the stub axle and hub before fitting the new seals and bearings.
Click here to return to Building Dropped Axles page